
Hedge Trimming Melbourne: When and How Often to Trim

8 July 2026

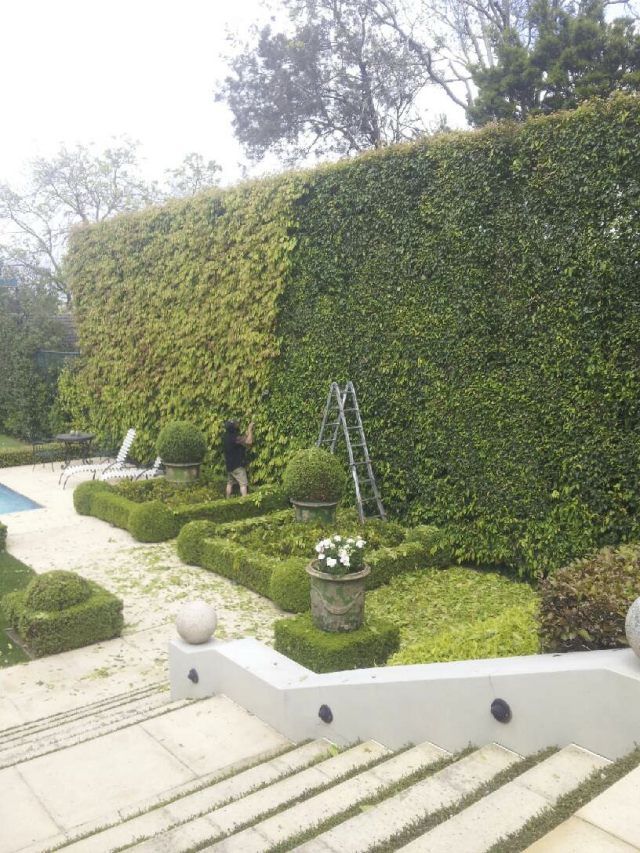
Melbourne's inner suburbs are full of gardens built around clipped hedges. Cypress, box, photinia, all doing the quiet structural work that holds a garden together, especially through the cooler months when everything else goes a bit bare. But a hedge only earns its keep if it's trimmed properly and on the right schedule, and that's where a lot of home gardens fall down. Trim too rarely and the hedge blows out, loses its line, and takes months to bring back. Trim at the wrong time of year and you risk knocking off next season's growth before it's had a chance to flush.

We look after hedges across Toorak, South Yarra, Armadale and Prahran as part of our regular garden maintenance rounds, and the questions we get asked most often are simple ones. How often should this actually be cut? Is there a wrong time of year to do it? Why does my hedge look patchy at the bottom? Here's what actually matters.


Why hedges need more than an annual tidy up

A hedge isn't a static feature. It's a living plant that's being trained into an unnatural shape, and that shape only holds if the plant is cut back regularly enough to keep dense growth close to the surface. Skip a season and most hedging species respond by pushing growth outward and upward, away from the core of the plant. The result is a hedge that looks fuller from a distance but is actually thinning out underneath, with bare wood and gaps once you get in close.

This is the pattern we see most often on properties that have gone through a change of gardener or a gap in maintenance. The hedge still looks reasonable from the street, but there's a wall of foliage sitting on top of a hollow, woody structure that takes real time to correct. Getting a hedge back into shape after a year or two of neglect is a slower process than most people expect, and it usually means a harder cut than anyone wants to give a plant that's supposed to be providing privacy or screening.

Regular trimming avoids all of this. Cut consistently and the plant keeps producing dense growth close to the last cut line, which is what gives a hedge that clean, solid look rather than a patchy or see-through one.


How often hedges actually need trimming

This depends heavily on species and how fast it's growing that particular season, but as a general rule for Melbourne conditions:

Fast growing species (photinia, lilly pilly, privet) typically need trimming three to four times a year during the growing season, tapering off over winter.

Slower, more structural species (box, some conifers) usually hold their shape well with two to three trims a year.

Italian cypress and similar columnar conifers are a bit different again. They don't push new growth as aggressively as broadleaf hedging, so they're often fine on a twice yearly schedule, but the trims need to be precise since these are usually feature plants doing a specific job in the garden's structure, not just a screening hedge.

Properties on a regular maintenance contract get their hedges assessed every visit rather than on a fixed calendar, which is really the better approach. Growth rates shift with rainfall, temperature and the season, so a hedge that needed cutting every six weeks in spring might comfortably go three months over winter.


Best time of year to trim in Melbourne

Late spring through to early autumn is generally the safest window for most hedging species in Melbourne, since this covers the active growing period and gives the plant time to recover and put on fresh growth before the cut line is visible again. Trimming heavily into winter can leave a hedge looking stalled, since growth slows right down and any bare patches from the cut sit there for longer before filling in.

That said, a light tidy up over winter is fine and often necessary, particularly for structural hedges like cypress that are more about maintaining a clean line than encouraging fresh growth. It's the harder, more aggressive cuts that are better scheduled for the warmer months.

Flowering hedges are the exception. Anything grown partly for its flowers needs trimming timed around its flowering cycle, otherwise you end up cutting off the very growth that would have produced next season's flowers.


What a proper trim actually involves

There's a difference between a quick tidy with a hedge trimmer and a trim that actually maintains the health and shape of the plant long term. A proper job means:

  • Cutting to a consistent line, checked from multiple angles rather than just eyeballing one face
  • Tapering the hedge slightly, wider at the base than the top, so lower growth still gets sunlight and doesn't thin out over time
  • Clearing cut material properly rather than leaving it to smother the base of the hedge or nearby garden beds
  • Checking for pest or disease issues while the foliage is exposed, since this is often the easiest time to spot problems early

This last point matters more than people realise. A regular trim is also a regular health check. Hedges that are only cut once a year, or only when they look obviously overgrown, tend to have problems caught much later, by which point treatment is harder and recovery slower.


A recent example: Toorak

We look after a Toorak property with a long run of Italian cypress forming the boundary line, paired with a dense groundcover bed running along the driveway. It's a good example of the kind of structural hedging that carries a garden through winter when everything else has gone quiet. The cypress line stays sharp with a twice yearly cut, kept precise since it's doing real visual work along the street frontage, tying the concrete and render of the house back into the garden. The groundcover bed gets a different rhythm entirely, cut back whenever it starts pushing past its edge, since it grows faster and looser than the cypress. It's a reminder that even in the one garden, different plants are often on completely different maintenance clocks, and treating everything on the same schedule is usually where things start to slip.


Signs your hedge is overdue

A few things worth watching for between scheduled visits:

  • Bare patches or visible gaps low down in the hedge, a sign growth has been pushed outward rather than staying dense
  • A soft or blurred line rather than a crisp edge, particularly noticeable on structural hedges like box or cypress
  • New growth extending noticeably past the last cut line, especially after a run of warm, wet weather
  • Leaning or splaying, where the weight of unchecked growth starts pulling the hedge out of its original shape

Catching these early keeps the correction simple. Left long enough, most of these issues need a harder renovation cut to fix, which usually means a less attractive hedge for a season or two while it recovers.


Frequently asked questions

How often should hedges be trimmed in Melbourne?
Most hedges need two to four trims a year depending on species and growth rate, with fast growing types like photinia or privet needing more frequent attention than structural species like box or cypress.

What is the best time of year to trim hedges in Melbourne?
Late spring through early autumn is generally the safest window for most species, since this covers the active growing season and allows the plant to recover before the next cut is due. Light tidy ups over winter are fine for structural hedges.

Why does my hedge look patchy or thin at the bottom?
This usually happens when a hedge has gone too long between trims. Growth pushes outward and upward rather than staying dense near the core, leaving bare wood and gaps lower down. Regular trimming prevents this by keeping growth close to the surface.

Can hedge trimming be done as part of regular garden maintenance?
Yes. Hedge trimming is generally most effective when it's assessed as part of an ongoing
garden maintenance visit rather than treated as a standalone job, since growth rates change with the season and each hedge often needs a different rhythm.


Backyard stairway under construction with black retaining walls beside a wooden fence and house wall
19 August 2026
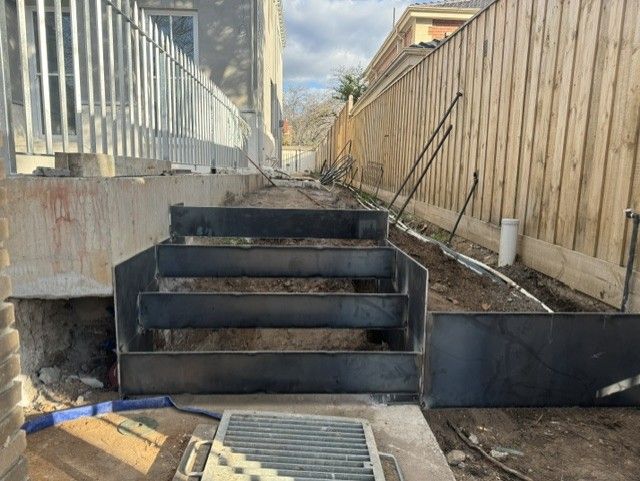
Anyone who has looked into garden steps in Melbourne for a narrow side passage knows the problem before the quote even lands. Most standard step solutions are designed for open garden beds with room to move, not a tight run between a boundary fence and the side of a house. When a block has a real change of level and next to no width to work with, the usual approach needs rethinking. That was exactly the situation on a recent job, a side access running down the length of a Melbourne home with a decent slope from front to back. The fix was a set of steel stair units, slim structural frames that hold the shape of the steps before anything else goes in on top. Why side access is its own problem Melbourne's inner and middle suburbs are full of period homes built long before anyone thought about side access as a design problem. Narrow gaps between the house and the boundary fence were left over space, not planned circulation. Somewhere down the track, that gap usually ends up as the main route to a garden shed, a bin store, a side gate, or the back garden itself. Add a natural fall in the block, which is common across large parts of Melbourne, and that narrow strip suddenly needs to manage a change of level as well as foot traffic. There is rarely room to spread a gentle ramp or a wide set of steps across the width available. Whatever goes in has to do its job in a fraction of the space a step in an open garden would use. This is where a lot of standard landscaping approaches run into trouble. A generously proportioned set of garden steps looks fine on paper, but in a passage that might only be 800mm to a metre wide, there simply is not room for a bulky structure on either side of the tread. Why steel stair units solve it The answer on this job was a series of steel stair units, welded steel frames set into the slope to form the risers and hold the structure of each step. Rather than pouring a full concrete stringer or building a masonry structure to support the steps, the steel frame does the structural work in a much slimmer profile. Poured concrete versus a steel frame A poured concrete step structure needs formwork, curing time, and enough width either side to build and finish it properly. In an open part of a garden that is rarely an issue. In a side access hemmed in by a fence on one side and a house wall on the other, it can eat into space that was never generous to begin with. A steel stair unit does the same structural job, holding soil and fill in place and defining the shape of each step, but it arrives pre-formed and goes into the ground far closer to the boundary than a poured structure could safely sit. For a narrow side access, that difference in footprint can be the difference between steps that fit comfortably and a passage that feels tighter than it did before the work started. Structure first, finish later What is visible in a job like this partway through is just the steel frame, sitting in raw soil with no surface finish yet. That is deliberate. The frame is the structural stage, get this right and everything that follows, backfill, base preparation and the finished tread surface, has something solid and correctly shaped to sit on. It is not the most photogenic stage of a landscape construction job. There is no paving, no planting, nothing that looks finished. But it is the stage that decides whether the steps sitting on top in a few months' time stay solid or start to shift, crack, or settle unevenly within a couple of years. What happens after the frame goes in Once the steel units are set and levelled, the next stages are backfilling behind and within each riser, compacting that fill properly, and building up a base ready for the finished tread. Depending on the brief, that tread might be paving to match the rest of the property, exposed aggregate, or another hard-wearing surface suited to a side access that gets regular foot traffic. Because the steel frame has already set the shape and pitch of the steps, this later stage is mostly about getting the base and finish right rather than fighting the structure itself. It also means changes to material or finish further down the track do not require touching the structural steps underneath. Drainage behind the steps matters just as much A narrow side access is often the path water takes off a roof, a driveway, or higher ground at the front of a block, especially once a fall has been built into it deliberately, as steps require. Water sitting against the back of a step structure, steel or otherwise, is one of the more common reasons steps in tight side passages fail early. Getting drainage right behind and beneath the steps, so water is directed away rather than pooling against the structure, is part of the same stage as backfilling and base preparation. It rarely gets a mention in a finished photo, but it is one of the details that separates steps built to last from steps that need attention again within a few wet Melbourne winters. Where garden steps fit into landscape construction A job like this rarely happens in isolation. Side access steps are usually one part of a broader landscape construction scope, connecting a driveway or street frontage to a rear garden, a pool area, or a renovated outdoor living space. Getting the structural stages right, steps included, is what the rest of a landscape construction project gets built on. It also overlaps with paving and hardscaping , since the finished tread on a set of garden steps needs to tie into whatever paving material runs through the rest of the property. Matching material, falls and finishes across steps and paving is what makes a side access feel like part of the property rather than an afterthought squeezed down the side of it. Timing also matters more than most homeowners expect. Structural work like a steel stair unit install is best done while a side access is already stripped back for a broader landscape construction or renovation project, rather than as a standalone retrofit once paving, planting and fencing are all finished and in the way. Where the two can be planned together, the steps end up better integrated and the job as a whole runs more efficiently. Getting it right the first time Steps in a high traffic side access take a beating over the years, weather, foot traffic, bikes and bins included. A structure that is undersized, poorly supported, or built without proper drainage behind it tends to show that wear early, with cracking, movement, or pooling water at the base. Starting with a proper structural frame, whether that is a steel stair unit or another engineered solution suited to the site, is what avoids that outcome. It costs more attention at a stage nobody will ever see finished, but it is exactly the kind of groundwork that keeps a side access looking and functioning the way it should for decades rather than years. Frequently asked questions Do all garden steps need a steel frame like this? No. A steel stair unit is one option among several for building garden steps, and it tends to suit tight, narrow sites where a poured concrete or masonry structure would take up too much space. Open garden areas with more room to work in often suit other structural approaches just as well. Can steel stair units be used on a sloped side access with existing fencing and services? Yes, that is a common scenario. Steel units are set into the slope in stages and can be positioned to work around existing fence lines, drainage points and other services already running through a side access, which is part of why they suit constrained sites. What happens to the raw steel frame, is it visible in the finished result? No. Once backfill, base preparation and the finished tread are complete, the steel structure is concealed beneath the surface. What is visible afterwards is the finished step, whether that is paving, aggregate or another chosen material. If a narrow side access at your own property has an awkward change of level, it is worth having someone look at the structural options before locking in a finish. Get in touch with the CHS team to talk through what a site like yours would need.
Cab view of an excavator loading gravel into a black dump trailer on a rocky construction site
14 August 2026
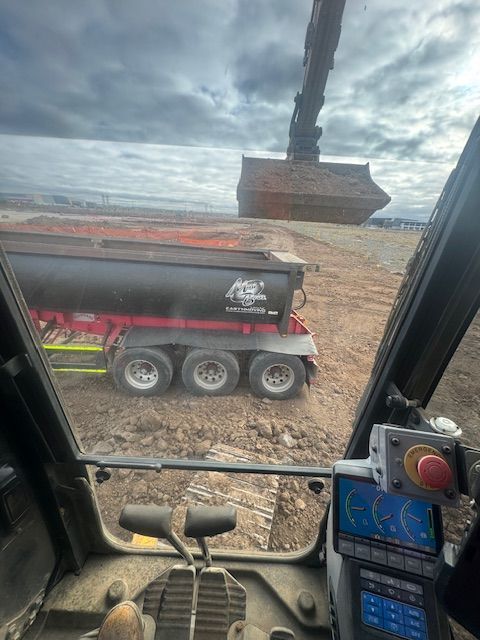
Ask most people how you move dirt off a site faster and they'll point at the truck. Get a bigger one, do fewer trips. On real earthmoving jobs around Melbourne, though, the bigger gains often come from how the material is carted, not just how much fits in the tray. Efficient spoil removal is one of the quiet levers that keeps a bulk earthworks program on time, and the trailer doing the carting has a lot to do with it. The photo above shows exactly that: one of our excavators loading a side tipper on a growth-corridor site, ready to run spoil off site without the stop-start of a conventional setup. What the photo shows It's a straightforward loading shot with a lot going on underneath it. An excavator sits over a side tipper trailer, dropping bucket loads of excavated material in ready to cart away. The site is a growth-corridor development on Melbourne's fringe, the kind of open, high-volume job where a lot of soil has to leave the ground before levels are right and the build can move on. The interesting part is the trailer. It's a side tipper, and on a job like this it does something a standard truck and dog can't. The hidden cost of stop-start cartage On a bulk earthworks job, the excavator loading spoil is rarely the bottleneck. The bottleneck is the cart: how quickly each truck can take a load, get it off site, empty, and come back for the next one. Any dead time in that loop multiplies across a full day and a full fleet. A conventional truck and dog carries plenty, but to empty it the driver has to stop, raise the body, wait for the load to slide out, lower it again and move off. Each of those tips is a pause. On a tight or busy site, trucks can end up queuing to tip, and while they wait, nothing is being carted. That's time the machines are running and the clock is ticking, with no material actually leaving the site. How a side tipper changes the maths Tipping on the move A side tipper empties differently. Instead of coming to a stop and lifting the whole body, it discharges the load out to the side, and it can do it while still rolling. There's no need to halt, tip and reset before the next run. The load goes out, the trailer keeps moving, and the truck is straight back into the cycle. Take the stopping out of the tip and you take a chunk of dead time out of every single load. Over a day of continuous cartage, that's the difference between a site that keeps flowing and one that spends half its time waiting on trucks. Fewer idle machine hours Faster turnaround on the cart does more than move dirt quicker. It keeps the excavator working instead of sitting with a full bucket and nowhere to put it. On earthmoving jobs, idle machine hours are pure cost: fuel, operator time and hire all ticking over while nothing productive happens. Tighten the cartage loop and the whole site runs leaner. Where side tippers earn their keep around Melbourne Not every job needs one. For a small residential cut, a more compact setup makes better sense. Side tippers come into their own where there's real volume and room to work. That describes a lot of what's happening on Melbourne's edges right now. Growth-corridor suburbs to the north and south-east are in constant build mode, with subdivisions, civil works and commercial sites all shifting large quantities of material. On those jobs, spoil removal is often the pace-setter, and an efficient cart method pays for itself over the life of the works. It's the same thinking whether it's a subdivision, a commercial pad or a civil earthworks program. You can see the range of civil and earthmoving work we take on across our projects , from open growth-corridor sites to tighter established suburbs. The cart is part of the earthworks, not an afterthought There's a habit of treating spoil removal as the boring bit at the end, something to sort out once the digging is under way. On a well-run job it's planned from the start. How much material is leaving, where it's going, what gear carts it and how the trucks flow in and out of the site all get worked out before the first bucket comes out of the ground. That's where running the earthmoving and the transport together matters. When the same team scopes the excavation and the cartage, the two are matched to each other rather than bolted together on the day: the right trailer for the volume, the right number of trucks for the cycle, and a loading setup that keeps everything moving. Our earthmoving and transport work is built around that kind of coordination, so the material coming out of the ground has somewhere to go without holding up the dig. Planning spoil removal on a Melbourne earthworks job If you're pricing or planning a job with a lot of material to move, it's worth thinking about the cart as early as the dig. The volume of spoil, site access, where it can be tipped and the gear used to move it all shape how long the job takes and what it costs. Get that right and a big earthworks program stays on schedule. Get it wrong and the machines end up waiting on trucks. CHS has run earthmoving and civil earthworks across Melbourne for over 30 years, alongside the landscaping and horticultural side of the business. If you've got a site with spoil to shift, get in touch for a free quote and we'll take a look at what it needs. Frequently Asked Questions What is a side tipper and how is it different from a truck and dog? A side tipper is a trailer that empties its load out to the side rather than lifting the whole body to tip from the rear. The main practical difference is that it can discharge while moving, so it doesn't have to stop, raise and reset to empty the way a truck and dog does. On high-volume cartage that removes a lot of dead time from each load. Why does spoil removal affect how long an earthworks job takes? On bulk earthworks the excavation is often faster than the cart. If trucks are slow to turn around or end up queuing to tip, the machines can be left waiting with nowhere to put the material. Efficient spoil removal keeps the excavator working and the site flowing, which is usually what sets the overall pace. Do you only use side tippers on large sites? No. The right cart method depends on the job. Side tippers suit high-volume work with room to operate, such as subdivisions and growth-corridor sites, while smaller or tighter jobs are often better served by other gear. Matching the method to the volume and the access is part of scoping the work. Do you handle earthmoving across Melbourne's growth corridors? Yes. We regularly work on growth-corridor and civil sites around Melbourne, as well as established inner and eastern suburbs. Large-volume earthmoving and spoil cartage is a core part of what we do alongside the garden and landscape side of the business. Can CHS manage both the excavation and the spoil cartage? Yes. Running the earthmoving and the transport together means the dig and the cart are planned as one job, so the material has somewhere to go without holding up the excavation. It's generally more efficient than treating the two as separate trades.
Yellow dump truck spreading dark material on a dirt road site
3 August 2026
Some of the most important civil earthworks in Melbourne happen before anything is built, and you would struggle to tell by looking. On a recent commercial site, the CHS team was preparing ground for a future wetland. The soil looked firm and workable. The problem was what it does the moment water touches it. This was sodic soil: dispersive, erosion-prone, and the kind of ground that quietly undoes a project if it is not dealt with early. Treating it is a specialised part of civil earthworks, and it is a good example of why the groundwork stage matters more than the parts people notice later. What "dispersive" and "sodic" actually mean Most soil holds together when it gets wet. You can dig it, shape it, run water across it, and it stays roughly where you put it. Sodic soil does not behave that way. Sodic soil has a high proportion of sodium sitting on the clay particles, and that sodium stops the clay from binding together. So when water hits it, the clay disperses, the structure collapses, and the soil effectively washes away as a muddy suspension rather than staying put. That is what dispersive means: the soil comes apart in water instead of holding its shape. On a dry day it can look completely stable. Add rain or runoff and it starts to erode, form channels, and shift. Left untreated on a site that is going to hold water, that is a serious problem. Why it matters more on a wetland site A wetland is designed to move and hold water. That is the whole point of it, which means the soil underneath and around it is going to be wet, often, and for long stretches. Build that on dispersive sodic soil without treating it first and you get erosion, sediment washing into the water, banks that slump, and a site that never settles into its intended shape. The design might be perfect on paper. The ground decides whether it actually works. Treating the soil: stabilising dispersive ground The fix for sodic soil is to change how the soil particles behave, so the clay binds together instead of dispersing. In civil and agricultural earthworks, that is typically done by working a calcium-based amendment such as gypsum through the soil. The calcium displaces the sodium, the clay structure holds together again, and the ground becomes far more stable when wet. The detail that matters is doing it thoroughly and at the right stage. Treatment has to be worked through the soil properly, not just spread on top, and it has to happen before the site is shaped and exposed to water. Get the timing and the coverage right and dispersive ground can be turned into a stable, workable base. The specifics of any given site's treatment come down to what that ground actually needs, because soil varies across a project and the right approach comes from testing and assessing it rather than a one-size formula. Shaping the site so water works with it Treating the soil is one half. Managing where the water goes is the other. Part of preparing a site like this is grading and shaping it so runoff moves in a controlled way rather than pooling or cutting its own paths. Good site preparation anticipates how water will move once the wetland is functioning, and once Melbourne's wetter months arrive, and shapes the ground so that movement is planned rather than accidental. This is standard civil earthworks discipline, the same thinking that goes into drainage and levels on any earthmoving job. Water always wins eventually, so the job is to decide where it goes before it decides for you. Why this is civil earthworks, not just moving dirt There is a view that earthmoving is a blunt trade: dig here, push that there, load the truck. Site preparation like this is the opposite. It relies on reading ground conditions, understanding how different soils behave, and knowing what has to happen, in what order, for the finished site to hold up. That is the civil earthworks side of CHS. Alongside the garden and landscape work the business is known for, the team runs earthmoving and site preparation across Melbourne, from residential builds to commercial and growth-corridor developments. The common thread with the horticultural side is the same one that runs through this whole job: the groundwork done properly at the start is what makes everything after it work. Where wetland and environmental work fits in Growth corridors and new developments across Melbourne increasingly include wetlands, retention basins, and landscaped drainage as part of the plan. These are not decorative extras. They manage stormwater, support planting, and handle runoff for whole developments. Preparing the ground for them, treating problem soils, controlling erosion and shaping levels, is specialised civil work that sits right at the intersection of earthmoving and horticulture. That happens to be exactly where CHS has worked for three decades, and it is part of the broader specialised services the team takes on. Some of that larger commercial work is captured on the projects page . The takeaway: the ground decides the result It is easy to judge a finished site by what is on top: the water, the planting, the shaped banks. But whether all of that lasts is decided much earlier, by how well the soil underneath was understood and treated. Dispersive sodic soil is a good reminder of that. Ignore it and it erodes the project from below. Treat it properly, at the right stage, and it becomes a stable foundation you never have to think about again. That is the quiet, unglamorous heart of good civil earthworks. Planning civil earthworks or site preparation in Melbourne? Whether it is a commercial development, a wetland or drainage project, or a residential build that needs the groundwork done right, the soil and site preparation stage is where the result is won or lost. CHS has handled civil earthworks and site preparation across Melbourne since 1995, alongside the horticultural and landscaping side most earthmoving outfits do not offer. Get in touch for a free quote and we will take a look at what your site needs. Frequently Asked Questions What is sodic soil and why is it a problem? Sodic soil has a high level of sodium attached to its clay particles, which stops the clay binding together. When it gets wet the structure breaks down and the soil disperses and erodes, even though it can look completely stable when dry. On any site that will hold or move water, that makes it prone to erosion and instability unless it is treated first. What does dispersive soil mean in earthworks? Dispersive soil comes apart in water rather than holding its shape. Instead of staying put when runoff crosses it, the particles separate and wash away as a muddy suspension. It is a common issue on some Melbourne sites and needs to be identified and managed during the earthworks stage. How do you treat sodic or dispersive soil? The usual approach is to work a calcium-based amendment such as gypsum through the soil, which helps the clay bind together again instead of dispersing. The treatment needs to be mixed through properly and carried out before the site is shaped and exposed to water. The exact method depends on the specific soil, so it is guided by assessing the ground rather than a fixed formula. Why does soil treatment matter for a wetland? A wetland is designed to hold and move water, so the surrounding soil spends a lot of time wet. If that soil is dispersive and untreated, it erodes, sediment washes into the water, and banks slump. Treating and stabilising the ground first is what lets the finished wetland hold its shape and function as intended. Does CHS do commercial and civil earthworks in Melbourne? Yes. Alongside garden maintenance and landscaping, CHS runs earthmoving, site preparation and civil earthworks across Melbourne, including commercial and growth-corridor projects. This mix of horticultural and civil capability is unusual, and it suits projects like wetlands where the two overlap.
Orange underground storage tank in a construction trench, with warning flags and mud around it
29 July 2026
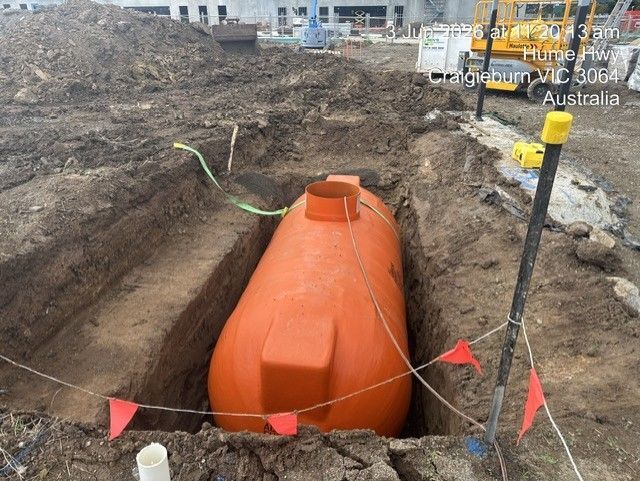
Some jobs look small on the run sheet and turn into a full day. This one was the opposite. Out on a construction site in Craigieburn, in Melbourne's northern growth corridor, an underground water storage tank went from a marked-out patch of dirt to a tank sitting level in the ground and ready for concrete backfill, all inside about four hours. Broke ground in the morning, done by lunch. It's the kind of result that only happens when the excavation and the tank placement are handled by the same crew, in one continuous sequence, rather than waiting on separate trades to turn up. Here's a look at what actually goes into an install like this, and why underground water storage is showing up more and more on new builds across Melbourne's north. Why go underground with water storage? Above-ground tanks are simple, but they cost you space and they're not always what a site can accommodate. On a tight residential block, a commercial development, or a growth-corridor build where every square metre is spoken for, an underground tank stores the same water without eating into usable land. Once the tank is set into the excavation and the surround is backfilled, the ground above it can be reinstated. Depending on the site, that means it can be paved over, planted out, driven on, or built near. The storage sits out of sight and out of the way, doing its job through the dry months when Melbourne water is worth holding onto. That's part of why we're seeing steady demand for it across the northern corridor. Suburbs like Craigieburn, Mickleham and Donnybrook are in constant build mode, and underground water storage suits new sites where the groundworks are already open and it makes sense to get the tank in while the machines are there. The install: four hours, one crew The speed on this job wasn't luck. It came down to sequencing the work so nothing sat waiting. First, the excavation. The trench has to be dug to the right depth and dimensions for the specific tank, with enough clearance around it to backfill evenly. Too tight and you can't get an even surround; too loose and you're moving more material than you need to. This is where having earthmoving gear and operators on the same team pays off. The hole is dug to suit the tank, not to whatever's roughly close enough. Then the base. The tank has to sit level and fully supported across its footprint, so the bottom of the excavation is prepared before the tank goes anywhere near it. A poly tank that isn't evenly bedded will carry uneven load once it's backfilled and filled with water, and that's exactly the kind of shortcut that causes problems years later. Then placement. The tank is set into the prepared trench, checked for level, and connected up. In the photo you can see it strapped and positioned, sitting square in the cut with the flagged site barriers around it. Finally, it's readied for concrete backfill. Underground poly tanks are backfilled with a concrete surround rather than just soil, because the concrete braces the tank walls against ground pressure and stops the tank shifting or deforming once it's loaded. Get that surround right and the tank is locked in for the long haul. That last stage is what the whole morning was building toward, and by lunch it was ready to pour. Why the civil side matters as much as the tank Anyone can drop a tank in a hole. The difference between an install that lasts and one that causes trouble is almost entirely in the groundwork around it, and that's civil work, not plumbing. The excavation depth, the base preparation, the evenness of the backfill, the way ground pressure is managed once the tank is loaded: all of it is earthmoving and site-preparation discipline. It's the same thinking that goes into footings and slabs on a construction job. When a business runs both the horticultural side and the civil side under one roof, a tank install doesn't get split across a digger operator who leaves once the hole is done and a separate crew who places the tank. One team scopes it, digs it, sets it and preps it. That's how a job like this gets finished in a morning instead of dragging across two site visits. CHS has run earthmoving and civil earthworks across Melbourne for over 30 years, alongside the garden and landscaping side of the business. Water storage sits right where those two capabilities meet, which is exactly why water storage and tank installation is one of the services we handle end to end. Water storage is only half the picture Storing water is one thing. Getting it to where it's needed, reliably and efficiently, is the other half. That's where storage links up with the wider water side of a property. On garden and landscape jobs, stored water often feeds into an irrigation system, whether that's a handful of drip lines through garden beds or a larger multi-valve setup across a whole property. Thinking about storage and supply together, rather than as two separate jobs, is what keeps the right amount of water in the right place at the right time. It's the same principle whether it's a suburban garden or a commercial site: plan the water system as a whole and it works; bolt bits on afterwards and you're forever chasing problems. Considering underground water storage in Melbourne? Whether it's a new build in the growth corridor, a commercial site, or a residential property where you'd rather not lose the space to an above-ground tank, underground water storage is worth looking at. The key is having the excavation, placement and backfill handled properly and in sequence, because that's what makes it fast to install and reliable for the long term. You can see more of the civil and landscaping work we do on our projects page , or get in touch for a free quote and we'll take a look at what your site needs. Frequently Asked Questions How long does it take to install an underground water tank? It depends on the tank size, the site access and the ground conditions, but a straightforward install can be dug, placed and readied for backfill in a single morning. On this Craigieburn job the tank went from breaking ground to ready-for-concrete in about four hours, largely because the same crew handled both the excavation and the tank placement in one continuous run. Why are underground poly tanks backfilled with concrete? A concrete surround braces the tank walls against the pressure of the surrounding ground and the weight of water once the tank is full. Backfilling with soil alone doesn't provide the same support, and can allow the tank to shift or deform over time. The concrete locks the tank in place and helps it hold its shape for the long term. Can you build or pave over an underground water tank? In most cases the ground above an underground tank can be reinstated once the install is complete, which is one of the main reasons people choose to go underground. What you can do above it depends on the tank, the depth and the site, so it's best assessed for the specific property rather than assumed. Do you install underground water tanks in Melbourne's growth corridors? Yes. We regularly work across Melbourne's northern growth corridor, including suburbs like Craigieburn, Mickleham and Donnybrook, as well as the inner and eastern suburbs. Underground water storage suits new-build sites particularly well, since the groundworks are already open and the tank can go in while the earthmoving gear is on site. Is a tank the same as an irrigation pump? No, they do different jobs. A storage tank holds water; an irrigation system pump boosts pressure to push that water through the lines and out to the garden or property. On many jobs the two work together, with stored water feeding an irrigation system, but they're separate parts of the setup.
Rectangular black pool cover in a concrete patio area, with white pipes and a small pink object at right
25 July 2026
Not every garden project starts with a blank patch of soil. This one started with an old pond that had reached the end of its useful life. Rather than fill it in and lose the space, the CHS team converted it into a raised planter box, built from the base up to drain freely, water evenly and keep whatever gets planted in it healthy for years. The part you can see in the photo is the part most people never notice: the groundwork that decides whether a planter thrives or slowly turns into a bog. Here is a look at what goes into a build like this, and why the irrigation and drainage sitting underneath matter far more than they get credit for. Drainage comes first, always Before a single plant goes in, the base has to manage water. The black matrix across the bottom of the planter is a drainage cell layer. These interlocking cells create a void beneath the soil so water can move down and away instead of pooling around the roots. Waterlogged soil is one of the most common reasons planters and raised beds fail. When soil stays saturated it starves the roots of oxygen, and root rot follows close behind. Build the drainage in from the start and the planter can handle heavy rain without drowning the plants. Skip it, and no amount of careful planting or watering will save the bed once the wet months arrive. This is where a planter box has more in common with proper landscape construction than with a bag of potting mix. The structure underneath does the long term work, the same principle CHS applies to footings, slabs and retaining walls on every build. Water in: a drip irrigation system built for the space With drainage sorted, the next job is getting water to the plants consistently. Running around the perimeter of this planter is a drip irrigation system, and for a bed like this it is exactly the right tool. A drip irrigation system delivers water slowly and directly to the root zone through a network of lines and small emitters. Instead of spraying water across the surface and losing much of it to wind and evaporation, a drip or trickle irrigation system puts water precisely where the plants need it, at a rate the soil can actually absorb. For garden beds, planters and hedging, that means healthier plants, less waste and far less hand watering. It is also why a drip irrigation system suits Melbourne gardens so well. Our summers are hot and dry enough that inconsistent watering shows quickly, and water is worth using efficiently. A well designed garden irrigation system takes the guesswork out of it and keeps everything on a steady schedule, whether it is a single planter, a run of garden beds or a full lawn irrigation system across a property. If you want to see the scope of what that can involve, our irrigation installation and maintenance work ranges from simple single valve setups right through to systems running sixty valves or more. Water out: the sump pump, and why pumps matter in irrigation Getting water to the plants is only half the story. This build also includes a sump pump to clear excess water after heavy rainfall. The drainage cells move water off the root zone, and the sump pump lifts it up and out so it never sits and stagnates at the base. It is worth clearing up a common mix-up here. A sump pump and an irrigation system pump do two very different jobs. A sump pump removes unwanted water. An irrigation system pump does the opposite, boosting pressure to push water through the lines where mains pressure alone will not do the job, which is common on larger properties or on systems running many valves and zones. On this planter, both directions of water management are handled: consistent supply through the drip lines, and reliable removal through the sump. Managing water from both directions is what keeps a reused feature like this performing. It sits alongside the broader thinking that goes into water storage and supply on a property, where the goal is always to keep the right amount of water in the right place at the right time. It is the difference between a planter that looks the part on day one and one that actually lasts. Why building it in from the start pays off The reason this planter will work is that the irrigation and drainage were designed into the build, not bolted on afterwards. Retrofitting drainage into a finished bed is disruptive and expensive. Adding irrigation once a bed is fully planted means working around established roots. Doing both from the base up, while the structure is open, is cleaner, cheaper over the life of the bed and far more reliable. That integrated approach, combining landscape construction, irrigation and drainage in a single job, is well suited to Melbourne properties where reworking an existing feature is often more practical than starting from scratch. An old pond, a tired water feature, a raised bed that never drained properly: all of them can be rebuilt into something that works, provided the groundwork is done right. Once it is planted up and running, a bed like this asks for very little beyond regular garden maintenance to keep it looking its best, because the hard part was solved underground before the soil ever went in. Frequently Asked Questions What is a drip irrigation system and how does it work? A drip irrigation system delivers water slowly and directly to the root zone through a network of lines and small emitters. Rather than spraying water across the surface, it releases it at a rate the soil can absorb, which reduces evaporation and waste and keeps plants evenly watered. It suits garden beds, planters, hedging and pots particularly well. Is a drip irrigation system better than sprinklers for garden beds? For garden beds and planters, usually yes. A drip or trickle irrigation system targets the root zone with very little waste, whereas sprinklers lose more water to wind and evaporation and can wet foliage in ways that encourage disease. Sprinklers still have their place across open lawns, but for beds and planters a drip system is generally more efficient and more effective. Why does a planter box need drainage if it already has irrigation? Because irrigation and drainage solve opposite problems. Irrigation supplies water, drainage removes the excess. Without proper drainage, water from rain or over watering has nowhere to go, the soil stays saturated, and the roots suffocate. A drainage cell base, and where needed a sump pump, keeps water moving through the bed so the plants get what they need without sitting in it. Do I need a pump for my irrigation system? Not always. Many garden irrigation systems run perfectly well on mains pressure. An irrigation system pump becomes useful on larger properties, on systems with many zones or valves, or where mains pressure is too low to run everything reliably. It is best answered by looking at the specific property and how the system needs to perform. Can an old pond or water feature be converted into a garden bed? Yes. An old pond or disused water feature can be converted into a planter box or raised garden bed, provided the drainage and irrigation are rebuilt to suit its new purpose. The existing structure often gives you a head start. The key is getting the base, the drainage and the watering right before any soil or planting goes in. Rework a tired feature into a garden that lasts Thinking about a drip irrigation system, a new garden bed, or converting a pond or worn out feature into something that actually works? CHS has designed and installed irrigation and built gardens across Melbourne since 1995, blending council grade horticultural knowledge with the civil and construction side most gardening companies do not offer. Get in touch for a free quote and we can have a look at what your space needs.
Narrow concrete walkway beside a building, with glass railing and tall evergreen trees on the right.
13 July 2026
Explore often-overlooked garden areas that impact property appeal. Ensure comprehensive care for all spaces. Contact us for a quote!
Narrow garden path with stepping stones beside a wall, tall cypress trees, and a deer at the end.
29 June 2026
Keep your structured cypress garden sharp year-round with expert maintenance tips. Contact us for cost-effective solutions today!
Maroon dump truck with blue bed parked on a roadside under overcast sky
22 June 2026
Learn how efficient earthmoving equipment transport supports landscaping projects. Contact us for cost-effective solutions today!
Yellow articulated dump truck parked in an industrial yard beside a warehouse
14 June 2026
Haulage is key in bulk earthworks. Ensure project efficiency with the right machinery. Contact us for expert garden maintenance solutions!
Construction trench with large black underground tank sections being installed, workers and machinery visible.
8 June 2026
Learn about installing a 20,000-litre underground water tank. Enhance water security & support irrigation needs. Contact us for expert help!